skincare
How to Repair Your Skin Barrier With a Simple, Gentle Routine
Calm a damaged skin barrier by pausing harsh actives, using gentle cleansing, moisturizing consistently, protecting...
Read Complete Guide →Melt-and-Peel Hard Wax Beans for At-Home Hair Removal
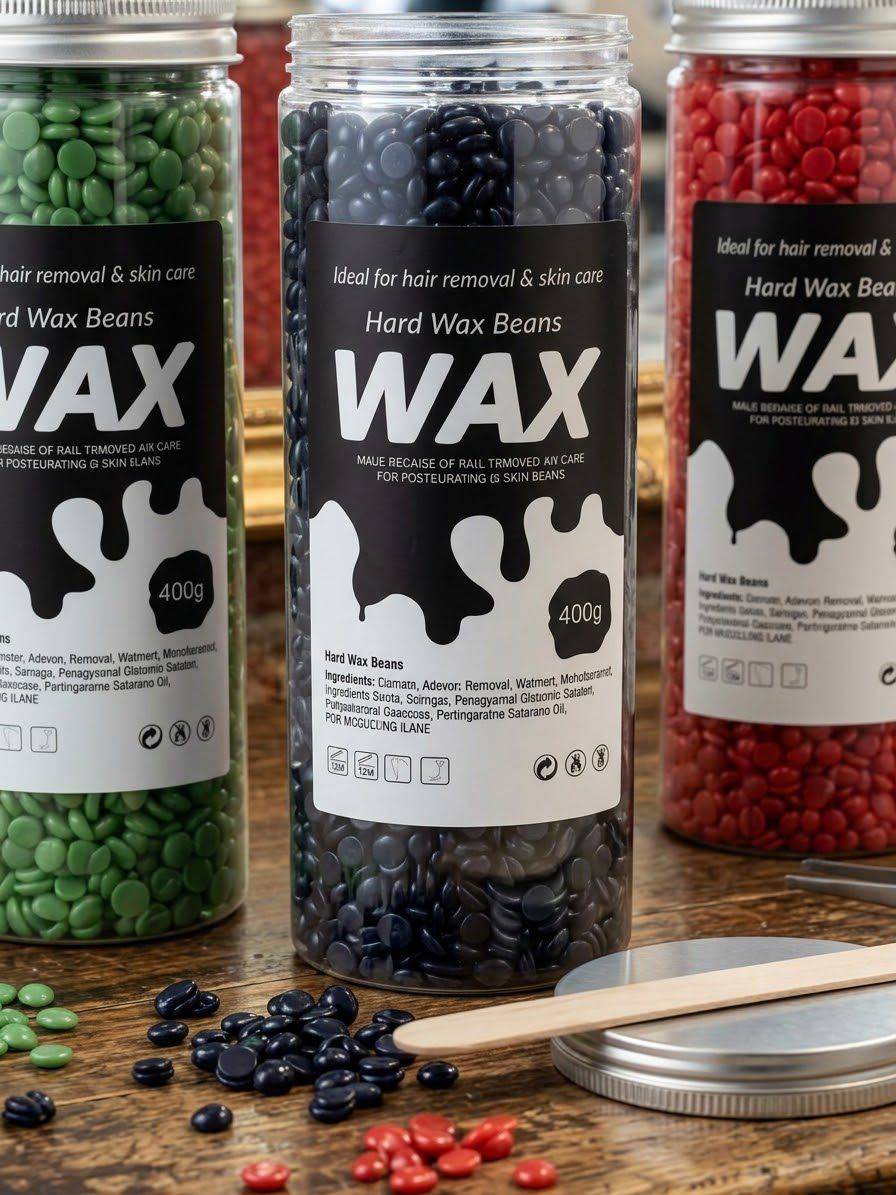
A 400g pack of hard wax beans that melt into a smooth, spreadable wax, grip the hair, set on the skin and peel away without strips. For smoother legs, arms and underarms at home. Beans only — a wax heater or suitable melting pot is required.
No credit card required. Fill your delivery details below to confirm your order directly with our dispatcher.
Keeping legs, arms and underarms smooth can turn into a regular chore. Salon appointments need booking, travel and waiting time, and the cost adds up every few weeks. Razors are quick, but the result often feels rough within a day or two, and repeated shaving can leave the skin feeling irritated, with short, stubbly regrowth that is hard to ignore.
Hair removal creams are another option, but they can feel messy, carry a strong smell, and need careful timing on the skin. For many people at home, the real problem is not a lack of options, it is finding one method that is affordable, works on coarser hair, and does not need a salon visit every time.
Hard wax beans answer that problem in a simple way. You melt only what you need, apply the warm wax yourself, and peel it away once it sets. There are no strips to buy separately and no appointment to keep. A 400g pack gives you enough wax for several at-home sessions, so hair removal becomes something you fit around your own schedule, in your own home, at a fraction of the cost of repeated salon visits.
No Strips Needed: This is a hard wax. It sets on the skin and peels away by hand, so you do not need cloth or paper strips.
Grips Hair, Not Just Skin: Melted wax coats the hairs and hardens around them, which helps lift even shorter, coarser hair from the root area.
Melt Only What You Need: Scoop out a small amount of beans per session. The rest of the 400g pack stays sealed and ready for next time.
Smooth Finish That Lasts Longer Than Shaving: Because hair is removed from the root, regrowth takes longer to appear than after a razor, and it usually feels softer when it returns.
At-Home Control: You choose the area, the amount of wax and the pace. Work on one leg at a time, take breaks, and stop whenever you like.
Economical 400g Pack: One pack covers several full sessions on legs and arms, making each session far cheaper than a salon appointment.
Start with clean, dry skin. Wash the area, pat it fully dry, and make sure it is free of oils, lotions and sweat. Hair should be long enough for the wax to grip, roughly the length of a grain of rice. Trim very long hair first so the wax can coat it evenly.
Pour a small amount of beans into a wax heater or a suitable melting pot and heat them until they melt into a smooth, thick, honey-like liquid. Stir now and then so the wax heats evenly. This pack contains beans only and does not include a heater, so you will need your own heater or melting pot.
Before the wax touches a larger area, dab a small amount on the inside of your wrist. It should feel comfortably warm, never hot. If it feels too hot, let it cool and test again. Never skip this step, because wax that is too hot can burn the skin.
Using a spatula, spread a layer of warm wax onto the skin in the direction of hair growth. Make the layer thick enough to peel, and leave a slightly thicker edge at one end to grip later. Work on one small section at a time.
Wait until the wax loses its shine and feels firm and slightly tacky, but still flexible. This usually takes well under a minute. If it is still soft and sticky, give it a little more time. If it turns brittle, it has set for too long, so remove it and apply a fresh layer.
Hold the skin taut with one hand. Grip the thick edge and pull the wax off quickly, close to the skin, in the opposite direction of hair growth. Press your hand gently onto the area straight after the pull to calm the skin.
Wipe away any small residue with a little plain oil on a cotton pad, then apply a gentle, fragrance-free moisturiser or soothing gel. Avoid sun exposure, hot showers, saunas, heavy exercise and scented products on the waxed area for the rest of the day.
Note: This is a beans-only pack. A wax heater, spatula and strips are not included, so please make sure you have a heater or a suitable melting pot before your first session. All parcels are securely packed with bubble-cushioning and verified before courier dispatch.
Hair removal is one of those routines that never goes away, which is why the method you choose matters so much. A method that depends on appointments will always cost you time as well as money, and a method that only lasts a day or two will always feel like it needs doing again. Hard wax sits in a useful middle ground: it takes a little practice, but once you know the steps, it gives you a smooth result that lasts noticeably longer than shaving, without leaving the house.
The strip-free nature of hard wax is a big part of its appeal. With strip wax, you need the wax, the strips and the right technique to press and pull them together. With hard wax beans, the wax itself becomes the strip. It hardens around the hairs, and you peel it away with your fingers. That means fewer supplies to buy, less waste per session, and one less thing to run out of halfway through a leg.
There is also a comfort angle worth being honest about. Waxing pulls hair from the root, so it is not a sensation-free process, and first sessions can feel sharper than later ones. Most regular waxers find the feeling becomes easier as the routine becomes familiar and the hair grows back softer and finer over time. Knowing the steps, testing the temperature and working in small sections all help keep each session as comfortable as it can be.
This pack suits people who already wax, or who are ready to learn the method properly. If you have a wax heater at home, or you are happy to use a suitable melting pot, and you want a larger pack for regular sessions, the 400g size makes sense. It also suits people with coarser hair on legs and arms, where razors leave visible stubble quickly and strip wax can struggle to grip.
It is also a sensible choice for anyone who wants control over timing. You can wax one evening, a few days before an event, rather than around a salon's availability. Because you melt only what you need, the pack stretches across many sessions, which helps if more than one person in the household waxes, or if you wax larger areas like full legs.
There are times to wait, though. If your skin is currently broken, irritated, sunburned or freshly exfoliated, postpone waxing until it has fully settled. The same applies if you have an active rash, cuts or irritation in the area you planned to wax, or if you have moles or warts you would need to work around. If you are unsure whether waxing suits your skin, or you are using strong skin treatments, it is worth checking with a skin specialist first rather than guessing.
Beginners should also start gently. Try the lower leg first, where the skin is less sensitive and the area is easy to reach. Once you are confident about melting, temperature testing, applying and pulling, you can move on to underarms and other areas with more care and smaller sections.
The easiest way to make waxing a habit is to give it a fixed place in your week. Many people wax in the evening, when there is no rush, the house is quiet, and the skin can rest overnight without sun or heat. Pick a day you can repeat, lay out everything beforehand, and keep the session short at first. A single leg or both underarms is a fine first session; you do not need to do everything at once.
Preparation is half the routine. Wash and dry the area, trim very long hair, and melt a small amount of wax first rather than a large batch. If the wax cools while you work, reheat it gently and test the temperature on your wrist again before continuing. Keeping a small bowl of plain oil and cotton pads nearby makes cleaning up residue quick at the end.
Timing around events matters too. Wax two or three days before an occasion rather than on the day itself, so any mild redness has time to settle and the skin looks its calmest. Avoid planning a session on a day when you will be in strong sun, a hot bath or a sauna straight afterwards. Aftercare is part of the routine, not an extra: a gentle moisturiser, loose clothing and a day away from scented products help the skin recover well.
Keep a simple note of when you waxed and how the skin reacted. Over a few sessions, you will learn how quickly your own hair returns, how much wax you actually use per session, and which areas need smaller sections. That record turns waxing from a guessing game into a routine you can plan around.
The most common mistake is wax that is too hot or too cool. Wax that is too hot is a safety risk and must never be applied, which is why the wrist test is non-negotiable. Wax that is too cool will not spread smoothly, will not grip the hair well, and will break apart when you try to peel it. Aim for a thick, honey-like consistency that spreads easily and holds its shape on the skin.
The second mistake is the layer itself. A layer that is too thin tears when you pull it, leaving bits of wax behind and hairs still in place. A layer that is too thick takes too long to set and can feel heavy on the skin. Practice on the lower leg until you can spread an even layer with a slightly thicker edge to grip. That edge is what makes the peel clean and controlled.
Pulling technique causes most of the remaining problems. Pulling slowly, or pulling upwards away from the skin, hurts more and breaks hairs instead of lifting them. Hold the skin taut, keep the pull fast and close to the skin, and press your hand onto the area straight afterwards. Working in sections that are too large is another error: a smaller section gives you control, a cleaner peel and a better result.
Finally, do not ignore preparation. Oily or damp skin stops wax from gripping, hair that is too short slips out of the wax, and waxing the same sore area again and again in one session only irritates the skin further. If a section does not come clean, leave it for another day rather than forcing it.
Right after a session, the skin usually feels smooth and looks clean, with some mild redness that typically settles within hours. A few tiny red dots where hairs were removed are normal and fade as the skin calms. This is the point where aftercare matters most: gentle moisturiser, no sun or heat for the rest of the day, and loose clothing over the area.
Over the following days, the smoothness lasts while new hair slowly begins its growth cycle. Because waxing removes hair from the root, regrowth takes longer to show than after shaving, and when it does appear it usually feels softer at the tip rather than stubbly. How long this takes varies from person to person, and even from one area of the body to another, since hair grows at different rates and in different cycles.
After a few regular sessions, many people notice the routine itself gets easier. The waxing steps become familiar, sessions take less time, and the regrowth pattern becomes predictable enough to plan around. That said, results vary: coarse hair, hormonal changes, and how consistently you wax all affect what you see. No single pack can change your natural growth cycle, and anyone promising otherwise is overselling.
A fair way to judge the product is over three or four sessions, not one. The first session teaches you the technique. The later sessions show you the real rhythm: how much wax you use, how long the smoothness lasts for you, and which areas respond best. Judge it on that pattern, and you will have an honest picture of whether at-home hard wax fits your routine.
Store the beans in a cool, dry place away from direct sunlight and heat, with the pack sealed between sessions. Heat and moisture can soften the beans and make them clump together, so a kitchen cupboard away from the stove is a better home than a bathroom shelf above a steamy shower. Keep the pack out of reach of children, and never leave melting wax unattended.
Safety starts before the wax touches your skin. Patch test on a small area first, especially if you are new to waxing or trying a new product. Then wrist-test the temperature every time you reheat the wax during a session, not just at the start. If the wax feels hot on your wrist, it is too hot for anywhere else. Let it cool and test again.
Do not use this wax on broken, irritated, sunburned or freshly exfoliated skin, and do not use it over moles or warts. If the skin feels sore after a pull, stop and let it settle rather than going over the same area again. After waxing, soothe the skin with a gentle, fragrance-free moisturiser, and avoid sun exposure, hot showers, saunas and scented products on the area for the rest of the day.
Discard wax once it has been used. Used wax should never be melted again or returned to the pack. Clean your spatula and heater pot after the session, and store any leftover melted wax separately only if it is completely unused and clean, following your heater's own instructions. When in doubt, throw it away and melt fresh beans next time.
Against razors, hard wax wins on how long smoothness lasts and how regrowth feels. A razor cuts hair at the surface, so stubble returns quickly and can feel rough. Wax removes hair from the root, so the skin stays smooth for longer and regrowth usually feels softer. The trade-off is time and sensation: waxing takes longer than a quick shave and involves a pulling feeling that shaving does not.
Against hair removal creams, hard wax gives you more control over exactly where the product goes, and there is no strong chemical smell or strict timing window on the skin. Creams dissolve hair at the surface, so their results sit between shaving and waxing in how long they last. Waxing also avoids leaving chemical residue on the skin, though it does ask more of you in technique and preparation.
Against salon waxing, the at-home pack wins on cost and convenience. One 400g pack covers several sessions for far less than the same number of salon visits, and you choose the timing. What a salon offers in return is experience: a trained therapist, a second pair of hands for hard-to-reach areas, and someone else managing the temperature and technique. For legs and arms, most people manage well at home. For very sensitive or hard-to-reach areas, a salon visit remains a sensible option, and there is no harm in mixing the two: home waxing for routine areas, salon visits for the tricky ones.
Compared with strip wax kits, hard wax beans have a simpler supply list. There are no strips to buy, store or run out of, and the wax itself peels away cleanly when the layer and timing are right. Strip wax can be easier for very large, flat areas in experienced hands, but for most at-home users the strip-free method means fewer supplies and less waste per session.
A 400g pack is a generous size, and the way to get value from it is to melt only what each session needs. Start with a small scoop and add more only if you run short. Melting a large batch for a small area wastes beans and leaves you with cooled wax that is awkward to store. Over a few sessions you will learn your own amount: roughly, a small scoop covers underarms, while legs need several scoops across the session.
Pairing the pack with the right tools also protects its value. A basic wax heater keeps the wax at a steady, spreadable temperature, which means fewer failed layers and less wasted wax than reheating in an unsuitable container. If you use a melting pot instead, follow its instructions carefully and never leave it unattended. A few reusable spatulas, kept clean between sessions, complete a simple kit that makes every pack last longer.
Value also comes from timing. Waxing on a regular rhythm, rather than in rushed bursts before events, means each session is calmer and more effective, with less rework on missed patches. Two or three days before an occasion is the sweet spot: the skin has settled, the result looks its best, and you are not paying salon prices for the same outcome.
Finally, remember the delivery maths. This pack is priced at Rs. 2,099, with a flat Rs. 220 delivery charge nationwide, and free delivery on orders above Rs. 2,999. If you are already planning a second pack or adding another item to your order, crossing that threshold removes the delivery charge entirely, which makes stocking up for future sessions a genuinely cheaper move than ordering one pack at a time.
Learn clinical dermatologist-aligned techniques, ingredient layering, and common mistakes to avoid.
Calm a damaged skin barrier by pausing harsh actives, using gentle cleansing, moisturizing consistently, protecting...
Read Complete Guide →
Learn how to build a basic skincare routine from scratch. We break down the exact products, layering order, and act...
Read Complete Guide →
Build a gentle acne-prone skincare routine with cleanser, moisturizer, sunscreen, and carefully introduced acne tre...
Read Complete Guide →